Hello, tea lovers and kitchen adventurers! There’s something deeply satisfying about brewing fresh ginger tea—the moment that knobby root hits hot water and releases its bright, spicy aroma, you know you’re in for a moment of pure comfort and glow. But let’s be honest: that first encounter with fresh ginger can feel a little intimidating. Those gnarly shapes, the thin papery skin, the fibrous texture—it’s easy to wonder if it’s worth the fuss. Spoiler: it absolutely is. And once you master a few simple tools and techniques for peeling, prepping, grating, and storing, making fresh ginger tea becomes effortless, enjoyable, and almost meditative.
As we’re sipping our way through the last of winter’s chill while craving brighter spring vibes, fresh ginger tea is the ultimate bridge: warming yet invigorating, immune-boosting, and endlessly customizable. The key to that perfect cup? Starting with properly prepped ginger. When you peel efficiently, grate smartly, and store cleverly, you waste less, get more flavor, and make brewing a daily delight rather than a chore. So grab your favorite mug (the oversized one, obviously), and let’s turn ginger prep from a task into an art form. You’ll be brewing barista-level adrak chai in no time.
Why Fresh Ginger Prep Matters for the Perfect Brew
Fresh ginger delivers a brighter, more vibrant kick than dried or powdered versions—its active gingerol compounds shine brightest when the root is handled with care. Peeling removes the papery skin that can add bitterness or texture you don’t want in your tea, while proper grating or slicing ensures even extraction of flavor and heat. And smart storage means you always have ready-to-use ginger on hand without waste or spoilage.
The good news? You don’t need fancy gadgets. Most of the best tools are already in your kitchen drawer. Let’s break it down step by step, from peeling pros to grating hacks and freezer-friendly storage tricks.
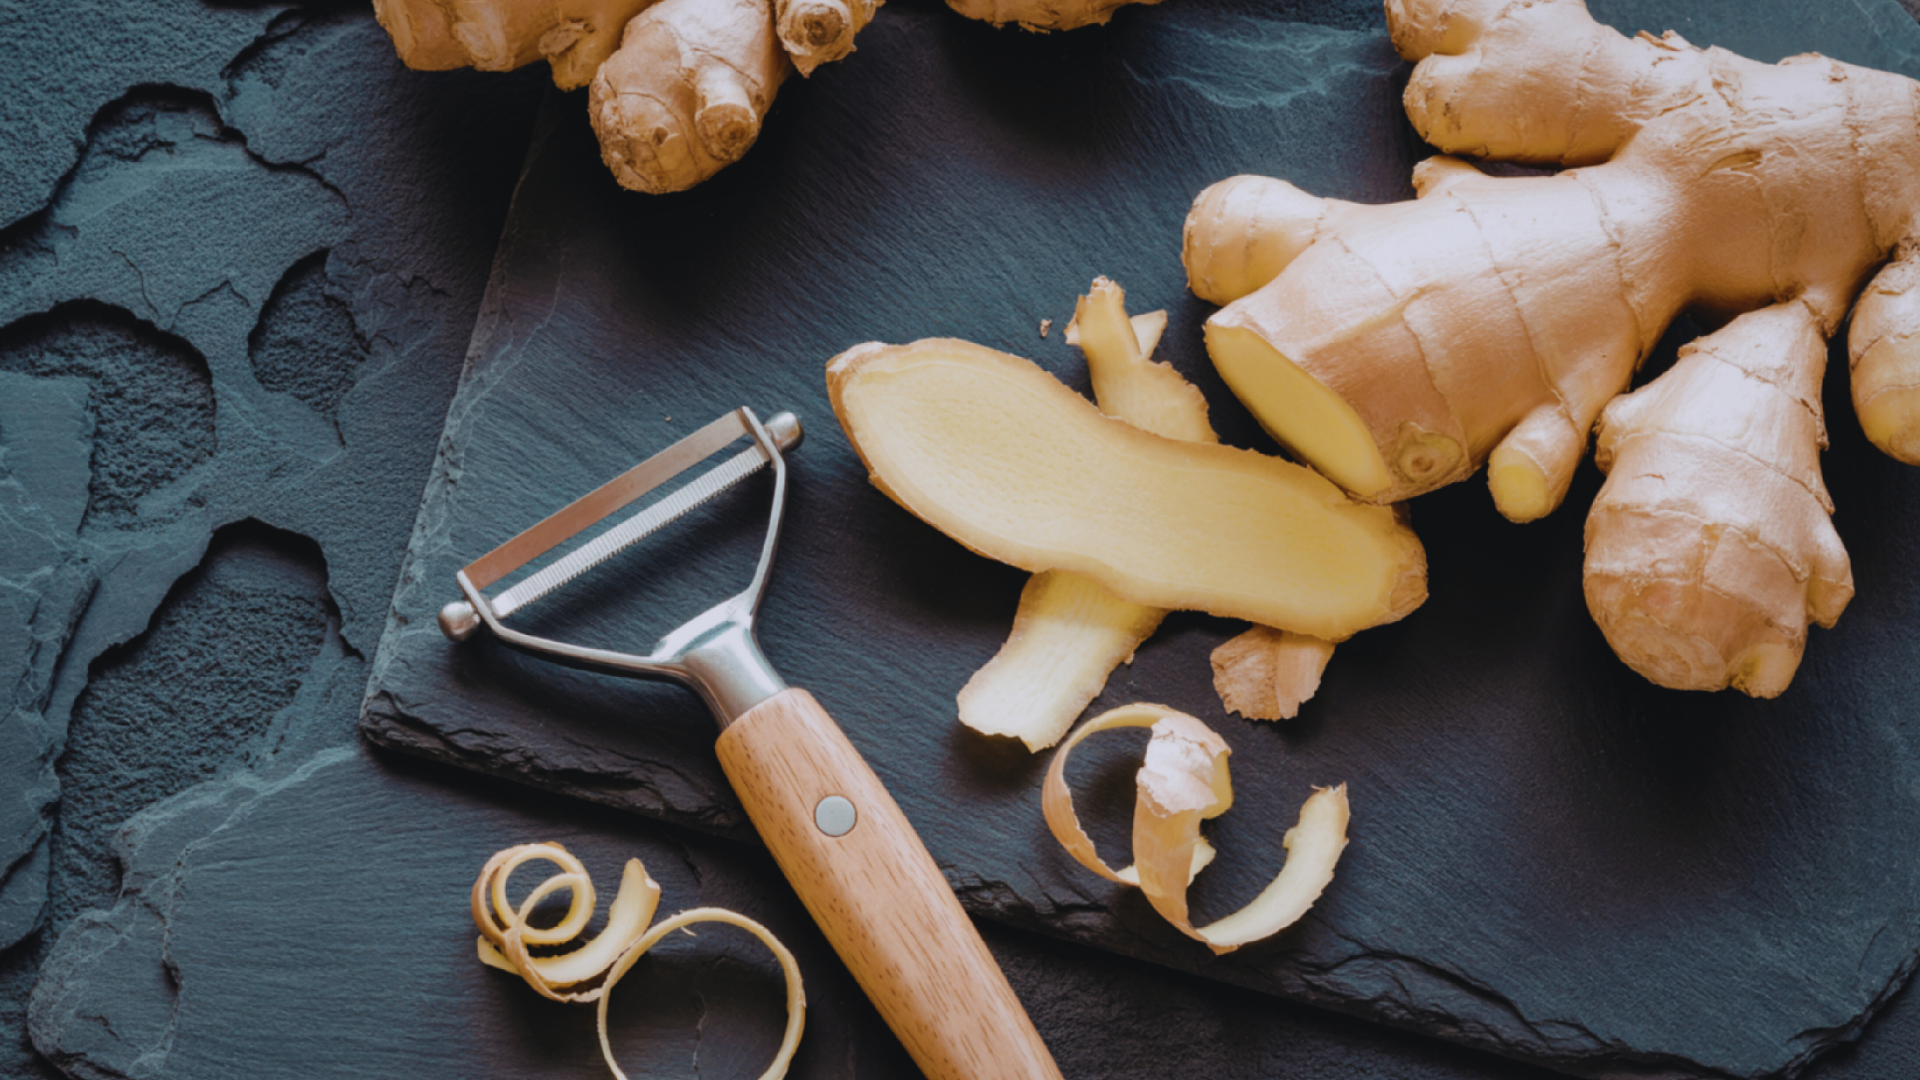
Peeling Ginger: The Spoon Is Your Secret Weapon
The number-one rule of ginger prep: ditch the vegetable peeler for most tasks. Traditional peelers work, but they often take off too much flesh (wasting precious root) and struggle with ginger’s irregular, knobby shape. Enter the humble teaspoon—the undisputed MVP of ginger peeling.
Why the spoon wins:
- It glides around curves and nubs without digging in.
- It removes just the thin skin, leaving maximum flesh.
- It’s safe—no sharp blade to slip on those bumpy roots.
Spoon-Peeling Technique (Step-by-Step):
- Rinse your ginger root under cool water to remove any dirt.
- Hold the root firmly in one hand (or anchor it on a cutting board for stability).
- Grip a regular metal teaspoon by the handle, bowl facing toward you.
- Use the edge of the spoon (the convex side) to scrape downward in firm, short strokes.
- Work your way around the root—follow the natural contours, digging gently into crevices with the spoon tip if needed.
- For awkward lumps or branches, simply slice them off with a paring knife and peel separately.
Pro tip: Young, tender ginger (often found at Asian markets) has such thin skin you can skip peeling entirely—rinse and use as-is for milder tea. Grocery-store ginger usually has thicker, papery skin, so peeling enhances clarity and smoothness in your brew.
Alternative Peeling Methods:
- Back of a paring knife: Use the dull spine (not the blade) to scrape—similar to the spoon but slightly more precise for flat sections.
- Vegetable peeler (when you must): Opt for a Y-peeler for better control; press gently and turn the root often. Reserve this for very smooth sections.
- No-peel hack for tea: If you’re simmering slices or chunks (common for adrak chai), leave the skin on—strain later. The skin adds subtle earthiness and extra nutrients.
Peel only what you need for immediate use—freshly peeled ginger oxidizes faster. For bulk prep, peel just before freezing or storing.
Grating and Slicing: Unlocking Maximum Flavor
Once peeled (or not!), how you cut ginger dramatically affects your tea’s intensity and texture.
Grating for Potent, Even Infusion: Grated ginger releases flavor fastest—perfect for quick-brew teas or when you want bold heat without long simmering.
- Best tool: A Microplane or fine rasp grater. Its sharp, etched holes slice through fibers cleanly, producing fluffy “ginger snow” with minimal waste.
- Technique: Hold the ginger perpendicular to the grater (fibers running across the teeth) to prevent clogging. Grate from the top down—use the unpeeled end as a handle for safety.
- Pro hack: Freeze the whole peeled root first—grating frozen ginger is effortless, produces a finer texture, and lasts longer.
- Alternative: Microplane’s 3-in-1 Ginger Tool (peeler, slicer, and grater in one) or a box grater’s fine side—though the Microplane wins for speed and cleanliness.
Slicing for Simmered Teas: For classic adrak chai or infusions where you want subtle flavor, thin slices work beautifully.
- Use a sharp paring or chef’s knife.
- Cut crosswise (across the grain) into thin coins—thinner slices = more surface area = stronger tea.
- Stack coins and julienne into matchsticks, then mince finely if desired.
Efficiency tip: For bulk prep, slice peeled ginger into coins, freeze flat on a tray, then bag—grab a few frozen slices straight into your pot for instant tea.
Storage Hacks: Keep Your Ginger Fresh and Ready
Proper storage turns occasional ginger use into a daily habit.
Short-Term (Fridge, 2–4 Weeks):
- Unpeeled whole root: Store in a paper towel-wrapped zip-top bag or airtight container in the crisper drawer—absorbs excess moisture.
- Peeled pieces: Blot dry with a paper towel, wrap tightly in plastic, or place in an airtight container. Use within a week to avoid oxidation.
Long-Term (Freezer, 3–6 Months):
- Whole peeled knobs: Wrap tightly in plastic wrap, then in a freezer bag—grate frozen for instant prep.
- Sliced or grated: Freeze slices flat on a parchment-lined tray; transfer to bags. Grated ginger freezes in tablespoon portions (ice cube trays work great—pop out for tea).
- Bonus: Freeze peels too—simmer for stock or second-brew tea.
Revival trick: Frozen ginger thaws quickly in hot water or grates even easier frozen—no need to defrost fully.
Making Ginger Tea Effortless: Your Daily Ritual
With prepped ginger at the ready:
- Quick mug brew: Grate 1–2 tsp frozen ginger into hot water, steep 5 minutes, add honey/lemon.
- Morning chai: Simmer sliced frozen coins with black tea, milk, and spices.
- Batch prep: Make ginger concentrate weekly—simmer grated ginger, strain, refrigerate or freeze in cubes.
These techniques turn ginger prep from a hurdle into a joy—efficient, waste-free, and flavorful.
So next time you spot fresh ginger at the market, grab a few roots. Arm yourself with a spoon, Microplane, and freezer bags, and get peeling. Your perfect cup of fresh ginger tea—bright, spicy, and glowing—is just a few scrapes away.
Brew on, gorgeous. Your ginger game just leveled up.